Spring Boot: Beginning Microservice with Eureka Naming Server step-by-step.

I assume that readers know the basics of Spring-boot and REST. Here we will try to learn how to implement Microservice using Spring boot, Eureka Naming Server and Feign.

Theory in short:

NOTE: you may skip this section and start directly from the “Implementation” section.

Microservice (Architecture) is a method to divide an application into multiple small independent services where each service is focused on well defined specific function.  And to achieve the overall functionalities of the application the services can communicate with each other. It is very important that each service is composed of very well defined interface and operations.

So How can we implement microservice?

From the above short discussion we can conclude that 2 things are very important:

  1. Create (divide) well-defined services and
  2. Communication among these services

RestTemplete can be used to call REST-API  for communication among services. But in this way, we need to hard code the address of other services which is not convenient to implement client-side load balancing when a service can have multiple instances to distribute the load.

To distribute client-side load balance Ribbon can be used. ‘Ribbon’ is a client-side load balancer that gives a lot of control over the behavior of HTTP and TCP clients. As Feign provide a better alternative to RestTemplate to call REST API and as Feign already uses Ribbon, we can use it directly (@FeignClient).

But still, with Ribbon we need to hardcoding the URL for all instance of a service to achieve load balancing. That means when new instances of a service are launched up we have no way to distribute load between them (without giving the address of new instance manually).

So, we need a naming service where all the service instances can register them and other services can find them as a list by specific name. When a new service instance registered them with the naming service, naming service will have the list of all the information about service(instances of services) which will send to Ribbon and Ribbon will manage the load balancing from the client side according to that information. So we don’t need to hard code all the URL of the instances of a Service. ‘Ribbon’ will get the updated list and can manage load balance accordingly.

To keep this in mind we are going to implement our microservice homework using Eureka naming service and Ribbon.


Implementation:

You can download the example source code from here. 


The step we will follow to complete the Task:

(1) Create 2 simple Spring boot application (Rest API).

(2) Run and test the 2 created application (as a monolithic application) independently.

(3) Configure and run an instance of Eureka.

(4) Configure the normal Rest APIs created in Step 1, so that they can register themselves with the Eureka Naming Server.

(5) find and calling (other) service registered in the same Naming server.

(STEP 1) Create 2 simple Spring boot application.
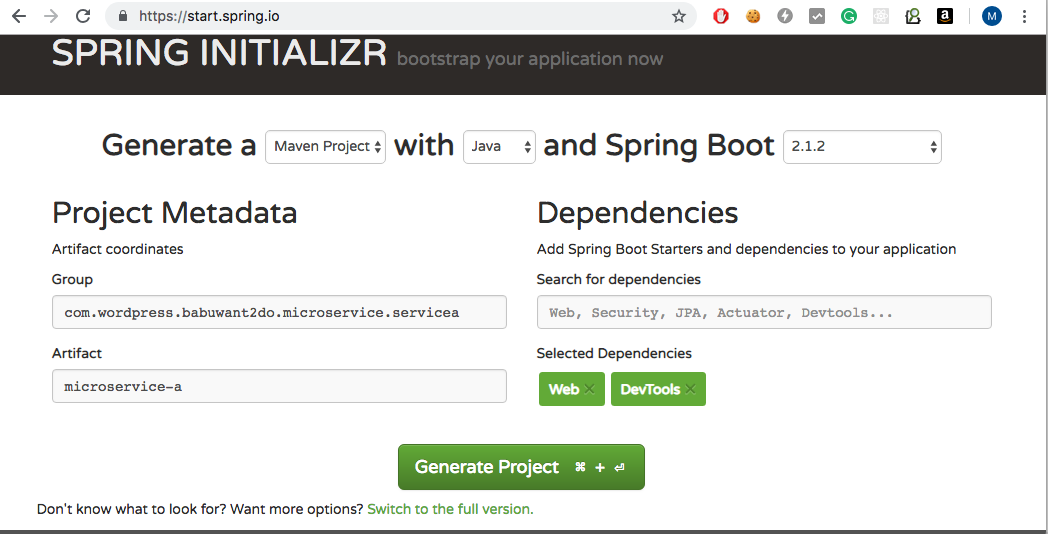
microservice_create_service_a

  1. Go to https://start.spring.io/
  2. Put “com.wordpress.babuwant2do.microservice.servicea” in “Group” field. (you can choose any other value as you want).
  3. Put “microservice-a” in “Artifact” field. (you can choose any other value as you want).
  4. Most importantly choose the dependencies, for sure you need to choose “web” and optionally I have chosen “DevTools” to make my life easier. But you can ignore “DevTools” as a dependency.
  5. Now click on “Generate Project”.  It will automatically create a Spring-boot and download it to your default download directory.
  6. Repeat step 1-5 to create another Spring boot application with different “Group” and “Artifact” value. For Example:
"Group": "com.wordpress.babuwant2do.microservice.serviceb" 
"Artifact" : "microservice-b"
"dependencies": "web" , "DevTools"

(STEP 2) Run and test the 2 created application (as a monolithic application) independently.

  1. Now we need to extract the compressed file and can optionally import the project from Eclipse or any other IDE.
  2. To run and test an application, we have to create a Rest controller. So, we created following Simple rest controller (in a new package: com.wordpress.babuwant2do.microservice.servicea.microservicea.web.rest):
package com.wordpress.babuwant2do.microservice.servicea.microservicea.web.rest;

import org.springframework.http.ResponseEntity;
import org.springframework.web.bind.annotation.PathVariable;
import org.springframework.web.bind.annotation.RequestMapping;
import org.springframework.web.bind.annotation.RestController;

@RestController
@RequestMapping("/api/resource-a")
public class ServiceAResource {
     @RequestMapping("/hello/{name}")
     public ResponseEntity hello(@PathVariable String name){
          return ResponseEntity.ok("Hello "+ name);
     }
}

2. Run the application from a command prompt using the following command (or by importing the project in eclipse, you will find lots of instruction if you google it ):

./mvnw spring-boot:run

3. Test the service from Postman (https://www.getpostman.com/). open postman (if not installed in your system, install it first).

  • Call get method using following URL: “localhost:8080/api/resource-a/hello/Ali”. you can replace the last part of the URL “Ali’ with whatever you want. we use port 8080 because default port for spring boot is 8080. we will change this port in the future.microservice_calling_service_a
  • After calling this service you will receive a message like: “Hello Ali”. And if you don’t receive any message, something is wrong.
  • Anyway, I hope all is good up to this point.

4. To test the “microservice-b” application follow 1 -3 of STEP-2. but before run the application make sure you have stopped the previous on “microservice-a”, otherwise the application run failed because of port conflict (both apps cannot run on same port 8080).  and to avoid confusion we created service with a different name as below:

package com.wordpress.babuwant2do.microservice.serviceb.microservicea.web.rest;

import org.springframework.http.ResponseEntity;
import org.springframework.web.bind.annotation.PathVariable;
import org.springframework.web.bind.annotation.RequestMapping;
import org.springframework.web.bind.annotation.RestController;

@RestController
@RequestMapping("/api/resource-b")
public class ServiceBResource {
     @RequestMapping("/welcome/{name}")
     public ResponseEntity welcome(@PathVariable String name){
          return ResponseEntity.ok("we would like to invite you ("+ name +") from resource B.");
     }
}

5. After running the application if you call get method with URL: “localhost:8080/api/resource-b/welcome/Ali” you must see an output like: “we would like to invite you (Ali) from resource B.”

Up to now, we have created 2 simple monolithic spring-boot application and tested with Postman. Everything works as expected. In the next step, we will try to set up a Naming server where other services (microservices) can register themselves and also can find and call other services.

(STEP 3) Configure and run an instance of Eureka.
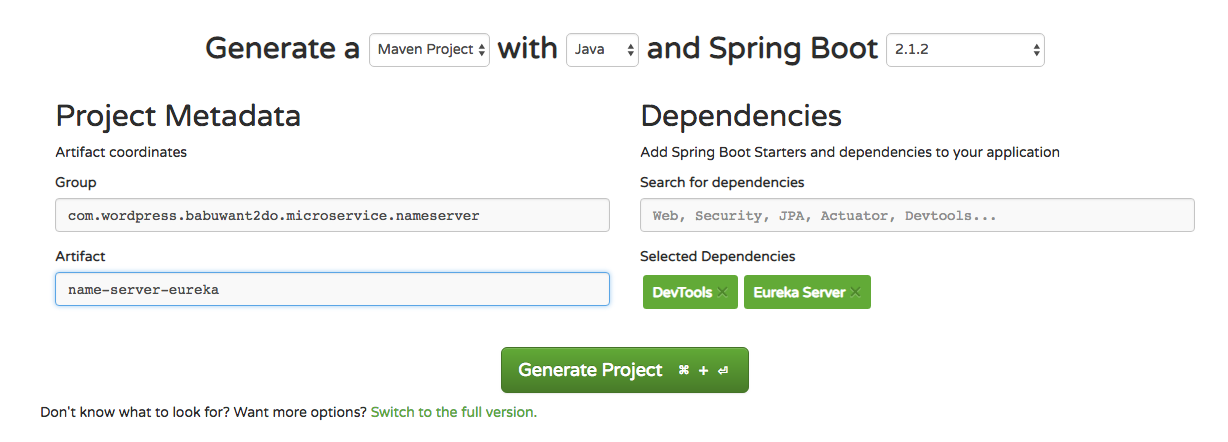
microservice_create_Eureka_server

  1. To setup Eureka Naming Server we have to follow STEP-1 with different dependency and maybe with different Group and artifact name:
"Group": "com.wordpress.babuwant2do.microservice.nameserver" 
"Artifact" : "name-server-eureka"
"dependencies": "Eureka Server" , "DevTools"

2. Extract the zipped file and import the project in your favorite IDE. before we run this project we need to work on this project as follows:

  • Open the following file: “/src/main/java/com/wordpress/babuwant2do/microservice/nameserver/nameservereureka/NameServerEurekaApplication.java”, and add “@EnableEurekaServer‘ on the class as below which is enough to make the application as Eureka Naming Server:
package com.wordpress.babuwant2do.microservice.nameserver.nameservereureka;

import org.springframework.boot.SpringApplication;
import org.springframework.boot.autoconfigure.SpringBootApplication;
import org.springframework.cloud.netflix.eureka.server.EnableEurekaServer;

@SpringBootApplication
@EnableEurekaServer
public class NameServerEurekaApplication {
     public static void main(String[] args) {
          SpringApplication.run(NameServerEurekaApplication.class, args);
     }
}
  • Now we need to configure the Server by inserting properties in the following file “/src/main/resources/application.properties”  as below:
# name the server
spring.application.name=naming-server-babuwant2do

# we need to change the port because we cannot run multiple 
# application on the same port. S we choose random port number but make sure that the port is not busy with other app.
server.port=8181

# We dont want that this app(naming server) don't register itself.
eureka.client.register-with-eureka=false

# We dont want that this app(naming server) try to fetch the registered service information.
eureka.client.fetch-registry=false
  • That’s it! now we can run the application as a simple spring boot application which will work as a naming server where other services (configured) can register themselves and can request for registered service information.
  • Run the app as a simple spring boot app with the command:
./mvnw spring-boot:run
  • go to your favorite web browser and go to http://localhost:8181/, you will see a home page with basic information of Eureka name server where so far no application/service is registered. microservice__eureka_dashboard_init
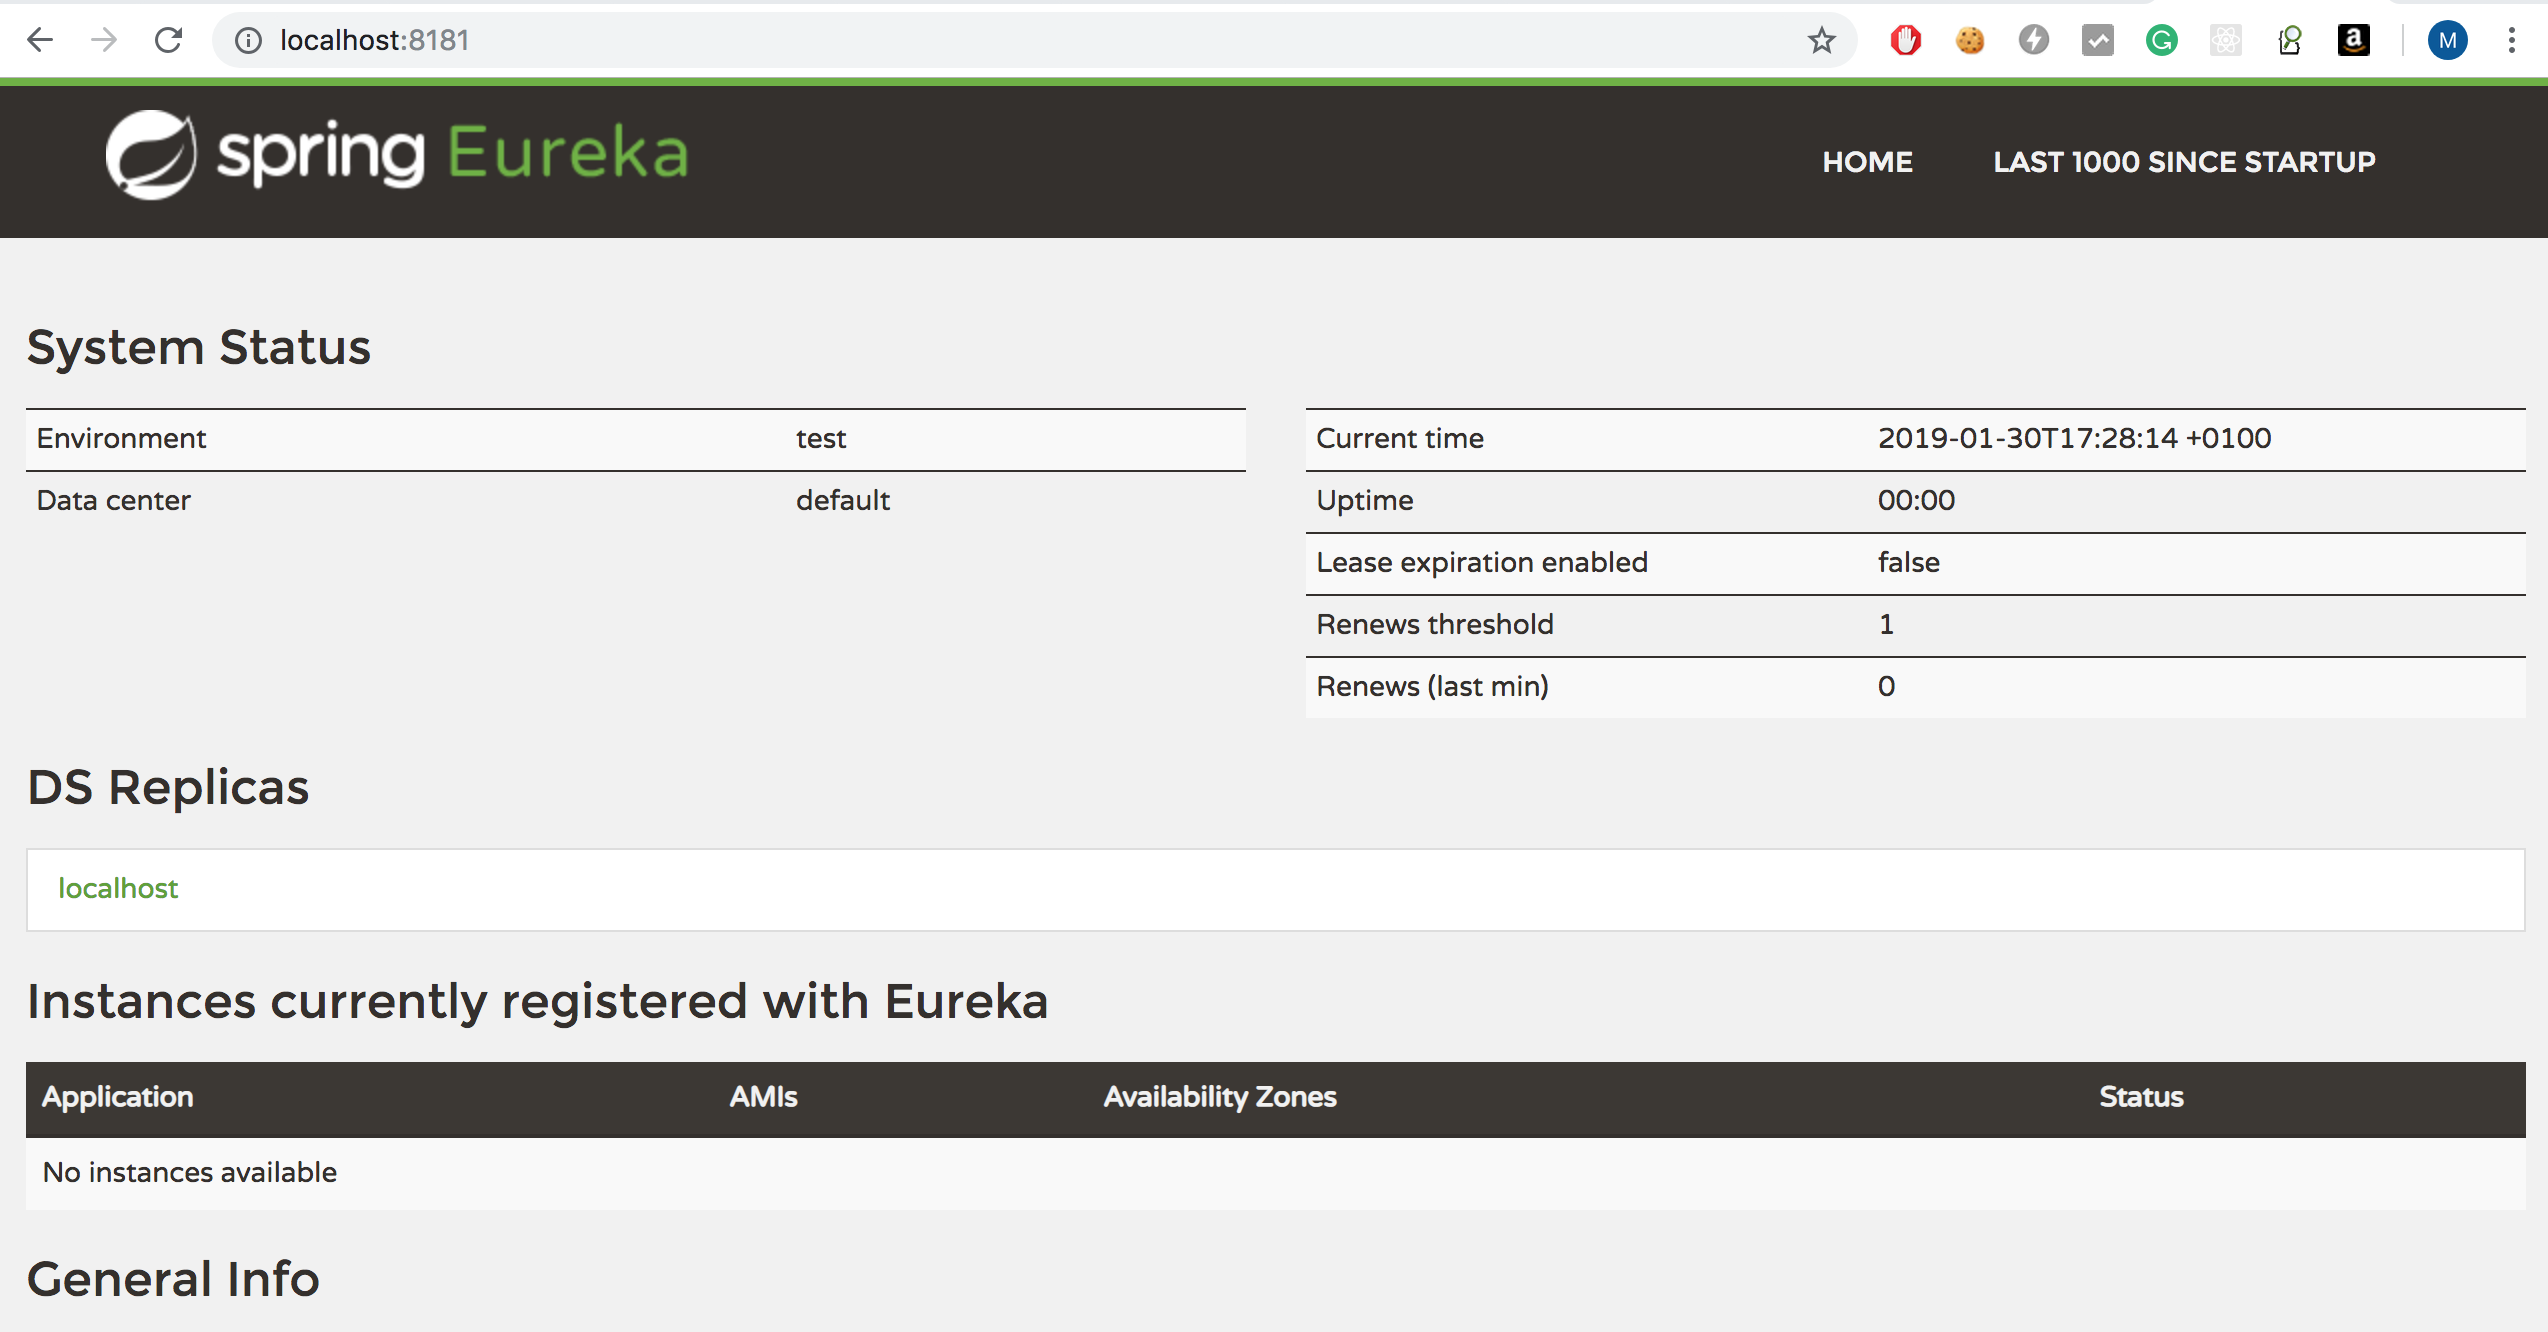
  • At this point, our Naming Server is ready to receive the Registration request from services.

(STEP 4) Configure the normal Rest APIs created in STEP-1 and STEP-2, so that they can register themselves in the Eureka Naming Server.

  1. To make a monolithic application like “microservice-a” to a microservice application it needs to have the capability to communicate with the name server. and to have this capability the application has a dependency which needs to add in the pom.xml file. you can manually modify the pom.xml file as below or you can create another project in spring initializer with “Eureka Discovery” dependency and just copy and past the missing part in your pom.xml file
<properties>
<java.version>1.8</java.version>
<spring-cloud.version>Greenwich.RC2</spring-cloud.version>
</properties>

<dependency>
    <groupId>org.springframework.cloud</groupId>
  <artifactId>spring-cloud-starter-netflix-eureka-client</artifactId>
<dependency>

<dependencyManagement>
<dependencies>
<dependency>
<groupId>org.springframework.cloud</groupId>
<artifactId>spring-cloud-dependencies</artifactId>
<version>${spring-cloud.version}</version>
<type>pom</type>
</dependency>
</dependencies>
</dependencyManagement>

<repositories>
<repository>
<id>spring-milestones</id>
<name>Spring Milestones</name>
<url>https://repo.spring.io/milestone</url>
</repository>
</repositories>

2. Add “@EnableDiscoveryClient” at the top of the main Spring boot application class in our case “MicroserviceAApplication” to enable Eureka Discovery Client.

3. Modify the property file as follows:

# use this name to register in the naming server
spring.application.name=micro-service-A
# change the port to avoid port conflict with other spring boot app.
server.port=8081

# To find the Naming server (server runs on port: 8181 in localhost)
eureka.client.service-url.defaultZone=http://localhost:8181/eureka

4. Run the application by executing the following command or run it from your IDE as a spring-boot application.

./mvnw spring-boot:run

After around 30 sec later you if you see the Naming server (http://localhost:8181/eureka) you will notice that “MICRO-SERVICE-A” is registered.
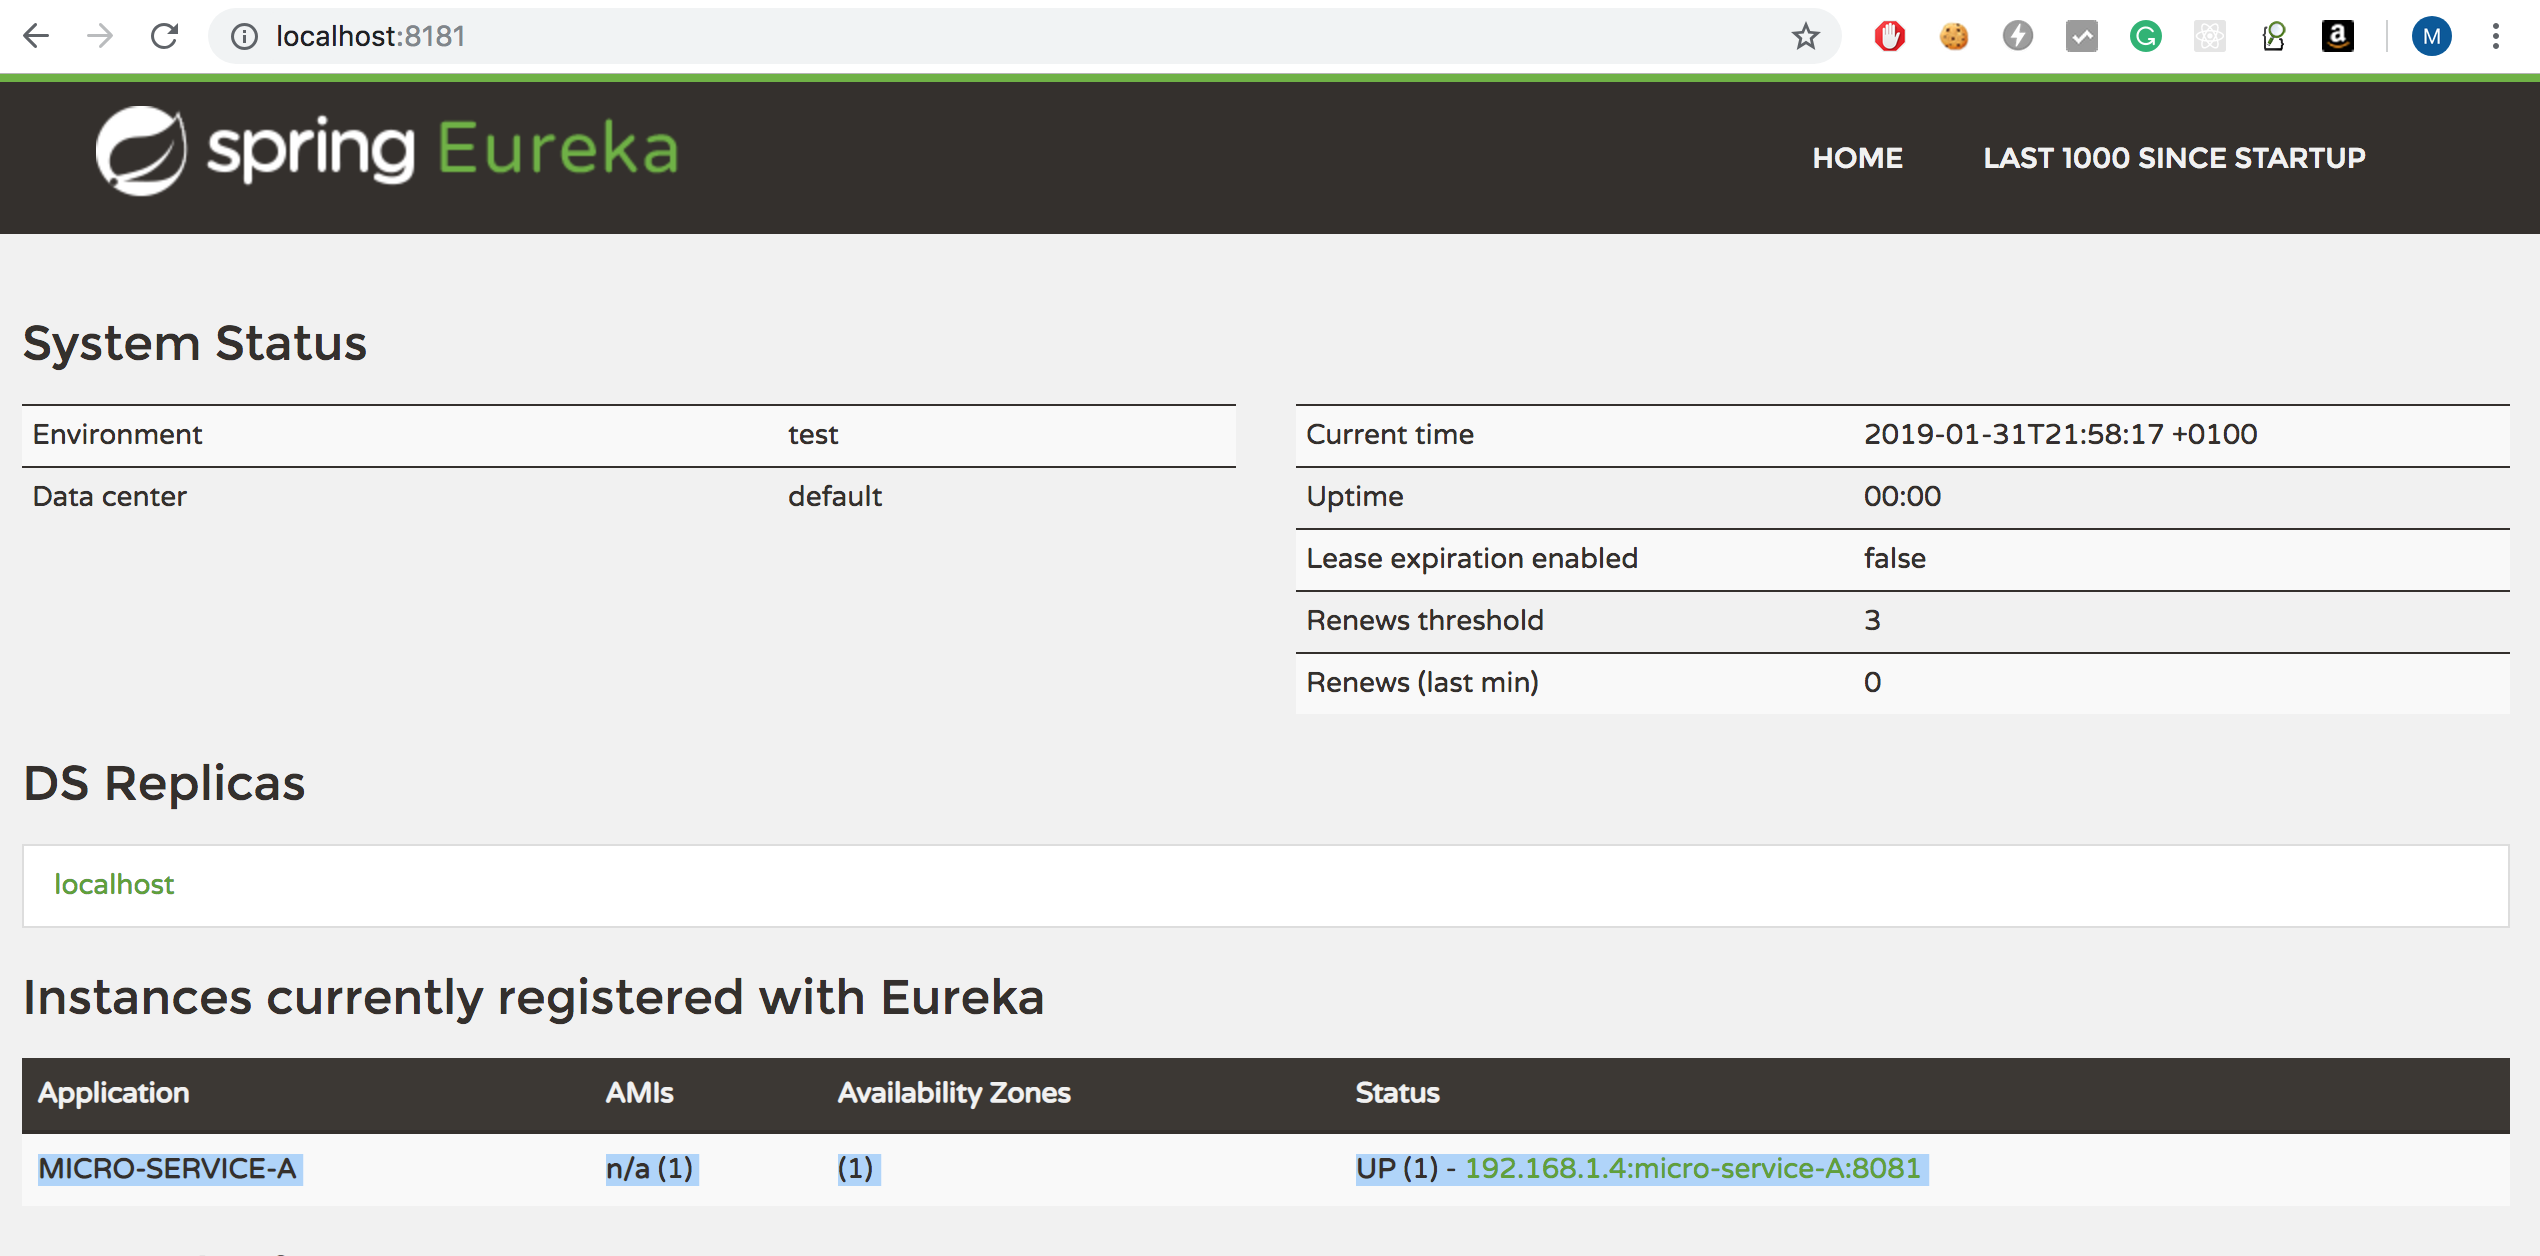
microservice_eureka_dashboard_with_service_a

Repeat the same steps (1-5) of STEP 4 for the “microservice-b” with a different application name and port number (different port number in case you want to run all the application from the same host to avoid port conflict). as an example:

# use this name to register in the naming server
spring.application.name=micro-service-B
# change the port to avoid port conflict with other spring boot app.
server.port=8082

# To find the Naming server (server runs on port: 8181 in localhost)
eureka.client.service-url.defaultZone=http://localhost:8181/eureka

If you run the application at this point you must see the 2nd application “MICRO-SERVICE-B” in the “Instances currently registered with Eureka” section. So, up to now, we have completed the registration part. in the next section, we will see how to find other service and call them from one service.

(STEP 5) finding and calling (other) service registered in the Naming server.

Now in this section, we are going to make a REST call of service-b from Service A.

  1. Add the following dependency in the pom.xml file of service a project
<dependency>
      <groupId>org.springframework.cloud</groupId>
      <artifactId>spring-cloud-starter-openfeign</artifactId>
</dependency>

2. Create a new interface name “ServiceBResourceProxy” as follows which will work as a proxy of  “ServiceBResource”. So can directly call a REST API of Service B using this proxy:

package com.wordpress.babuwant2do.microservice.servicea.microservicea.web.proxy;

import org.springframework.cloud.openfeign.FeignClient;
import org.springframework.http.ResponseEntity;
import org.springframework.web.bind.annotation.PathVariable;
import org.springframework.web.bind.annotation.RequestMapping;

@FeignClient(name="micro-service-B")
@RequestMapping("/api/resource-b")
public interface ServiceBResourceProxy {
     @RequestMapping("/welcome/{name}")
     public ResponseEntity welcome(@PathVariable String name);
}

3. In the main class  “MicroserviceAApplication” add annotation @EnableFeignClients to enable “Feign” in our application.

package com.wordpress.babuwant2do.microservice.servicea.microservicea;

import org.springframework.boot.SpringApplication;
import org.springframework.boot.autoconfigure.SpringBootApplication;
import org.springframework.cloud.client.discovery.EnableDiscoveryClient;
import org.springframework.cloud.openfeign.EnableFeignClients;

@SpringBootApplication
@EnableDiscoveryClient
@EnableFeignClients
public class MicroserviceAApplication {
     public static void main(String[] args) {
          SpringApplication.run(MicroserviceAApplication.class, args);
     }
}

4. Last but not least, we will call the REST-API of Service-B using the proxy class “ServiceBResourceProxy” we just created. To do this we need to modify “ServiceAResource” and take advantage of Spring Dependency Injection to have an instance of  “ServiceBResourceProxy”. And finally, call the service and return the output  from service-b with our original output of “ServiceAResource”:

package com.wordpress.babuwant2do.microservice.servicea.microservicea.web.rest;

import org.springframework.http.ResponseEntity;
import org.springframework.web.bind.annotation.PathVariable;
import org.springframework.web.bind.annotation.RequestMapping;
import org.springframework.web.bind.annotation.RestController;

import com.wordpress.babuwant2do.microservice.servicea.microservicea.web.proxy.ServiceBResourceProxy;

@RestController
@RequestMapping("/api/resource-a")
public class ServiceAResource {

     private final ServiceBResourceProxy serviceBResourceProxy;

     public ServiceAResource(ServiceBResourceProxy serviceBResourceProxy){
          this.serviceBResourceProxy = serviceBResourceProxy;
     }

     @RequestMapping("/hello/{name}")
     public ResponseEntity hello(@PathVariable String name){
          String welcomeMSg = this.serviceBResourceProxy.welcome(name);
          return ResponseEntity.ok("Hello "+ name+"\n"+welcomeMSg);
     }
}

5. Run the application as before using the command if not restarted successfully:

./mvnw spring-boot:run

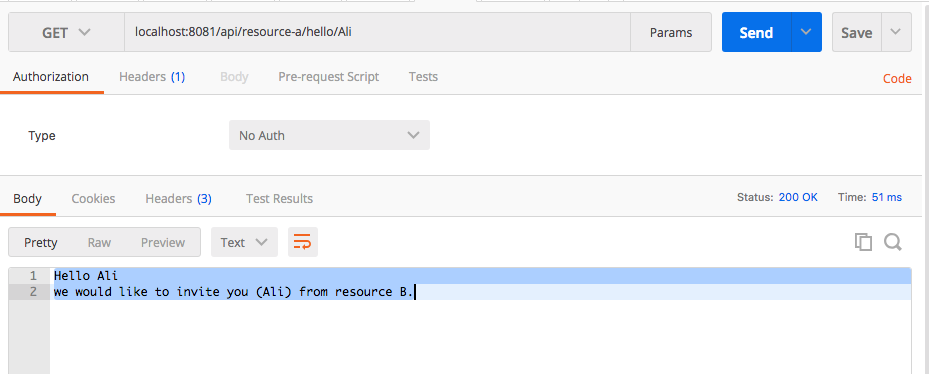
6. As STEP-2 call get method using following URL: “localhost:8081/api/resource-a/hello/Ali”. As we promised in STEP-2 and implemented in STEP-4, to avoid port conflict here we use port 8081.

After calling this service you will receive a message like below instead of  “Hello Ali”:

Hello Ali
we would like to invite you (Ali) from resource B.
microservice_out_final

That means we call rest API of service-A but we received output from Service A and also Service B.

Conclusion:

So, finally, we have completed the very basic implementation of microservice using Eureka Naming service and “Feign”, consumed a service from another service and finally return the output to the final client endpoint.

This article is written based on my personal experience and for the beginner who wants to implement the microservice architecture step by step. Here I tried to explain the concept in an easier way, maybe very much informal way. If you think there are big conceptual mistakes, please feel free to correct me in the comments section, so that other readers can get the correct information.

Thanks for reading with patience!!

React JS: Beginning React Redux with easy example step-by-step.

Audience:

  • Those who know basic of React JS and Redux library.
  • Who wants to understand how to implement Redux with React.

Introduction:

There are many tutorials that explain very nicely how redux works and covers every important fact about redux in depth. I have read several articles, understand the concepts and finally get confused when trying to write code as a beginner.  In this tutorial, the goal is to implement  Redux with React in the simplest way and understand the very basic of Redux and its life cycle.

Little Theory:

What is  Redux?

Redux is a state container for JavaScript apps.

But… every React.Component has its own state, why do we need another state container?

Because the state of the entire app will store and manage from a single commonplace called Store, which is easier to manage for an App which has many components.  For the better picture,  you may have a look at Redux documentation and other tutorials.

Imagine a Super easy example:

let’s say, we have a Number X. We want to implement following two actions on this number:

  1. Toggle the sign of number from (X) positive to (-X)Negative and vice versa.
  2. Add a certain number Y to this Number X, means increment number X by Y.

We are going to create a View which will have 2 buttons to execute 2 actions we need and an Input field to insert the value of (Y) increment by, which will add to the number (x) to calculate the new value.

You can download the full source code Here on github.com.


Setup Project:

Step 1.1: create a new react (web) app

$create-react-app redux-basic-app

Step 1.2:  run and see the output

$cd redux-basic-app
$yarn start   OR  $npm start

image: output

image: directory structure

we are going to implement this example in 2 steps:

  • In Part 1 implement using the standard Callback function and local state of Component [without redux].
  • In Part 2 implement using the Redux.

PART 1: Implementation without Redux:

Step 2.1: before writing further code, I created a new folder “myCode” in the “redux-basic-app/src/”. I will create all of the new Javascript files here for simplicity.

[Note: this is not best practice, there are several good tutorials which explains the best way to manage codes. But for this tutorial, I am going to write all of my code in a single folder so that we can focus on only how to implement Redux with React, and don’t have to spend the time to find out codes/file. Sometimes It makes me crazy when I try to understand a concept and there is very complex design pattern.]

image:

Step 2.2: create New View/Component:

“redux-basic-app/src/myCode/MyView.js”

And write code accordingly. As we assume the reader already knows React, here we are not going to explain the entire code, just indicate few important point.

Screen Shot 2018-02-15 at 19.21.29

In the state we declare 2 variable one “number” to store the value (X) on which we want to execute actions, another “incrementBy” to store the value (Y) which will use to increment the number (X). React_1_basic_constructor

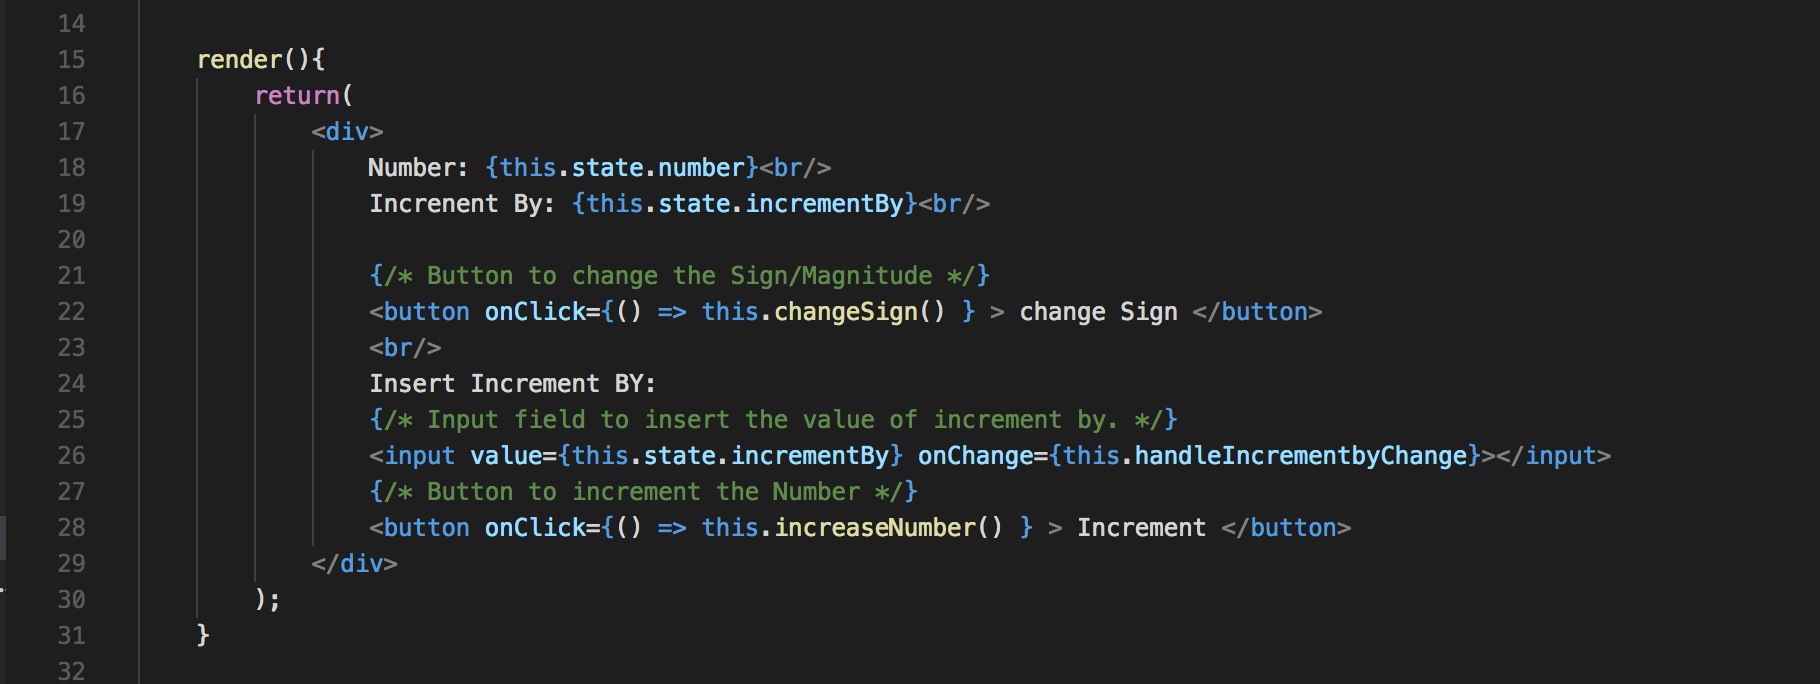
Here we create the presentation part of the view, 2 buttons and one input field. and the two call back functions are linked with this 2 button which will fire when the buttons will be clicked.React_1_basic_Render

Callback function for input box to update the value of state.incrementBy when we change the text in the input box.React_1_basic_CallBk_IncrementByChange

Callback function which toggles the magnitude of the state.number.React_1_basic_CallBk_ChangeSign

Callback function which increases the value of state.number with newly calculated value.React_1_basic_CallBk_increaseNum

Step 2.3:

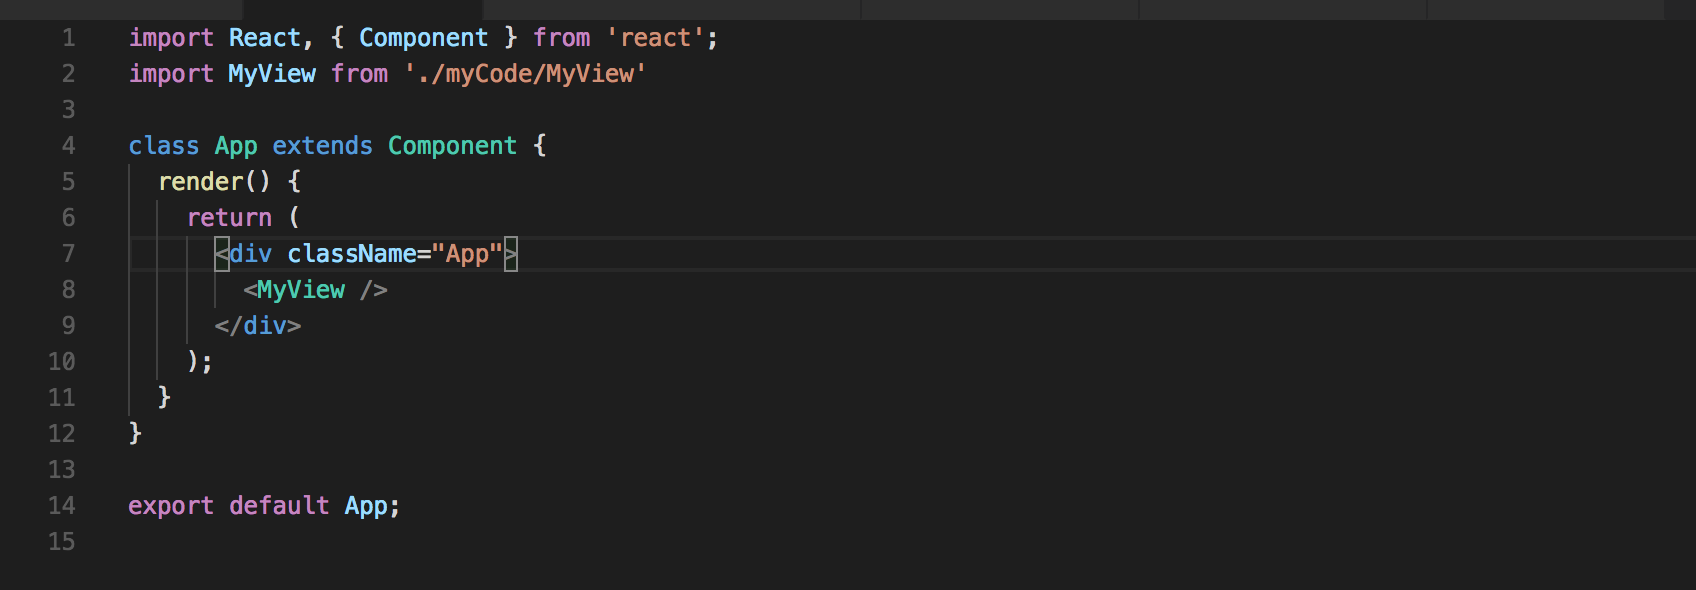
Modify the “redux-basic-app/src/App.js” as following, to add newly created component “MyView”.

Screen Shot 2018-02-15 at 19.43.26

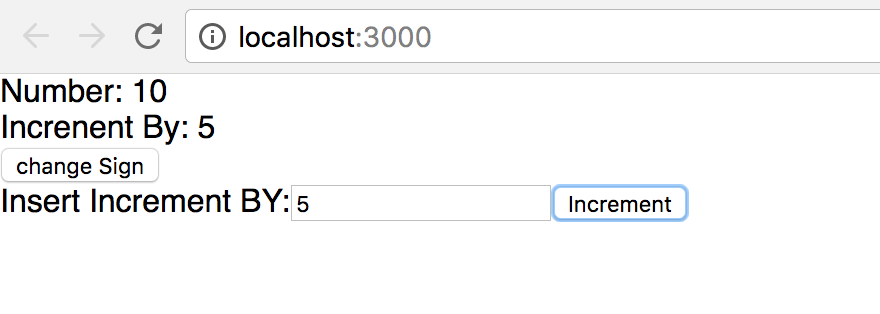
Now if we run the app again we will see something like below and if we click on the button or change the text in input box we can see the changes made in the first line “Number: x”.

React_1_basic_output

PART 2: Implementation using Redux:

In this section, we are going to implement the same function using Redux and try to understand each step of implementation.

Step 3.1: install addition package for  redux:

we need to install 2 additional libraries: (i)redux (ii) react-redux

$yarn add redux react-redux

Step 3.2: Create Action

Theory of Action:
In short, Action is like a command which describes “what to do?”, not “how to do?”. Each Action is represented as Object. And if any additional information is needed to execute that Action it is also included in that object which represents the Action. So… How the Action will be executed and who will execute the action? Well, we will see this soon, just keep in mind that this is not the responsibility of an Action.
Code and explanation:
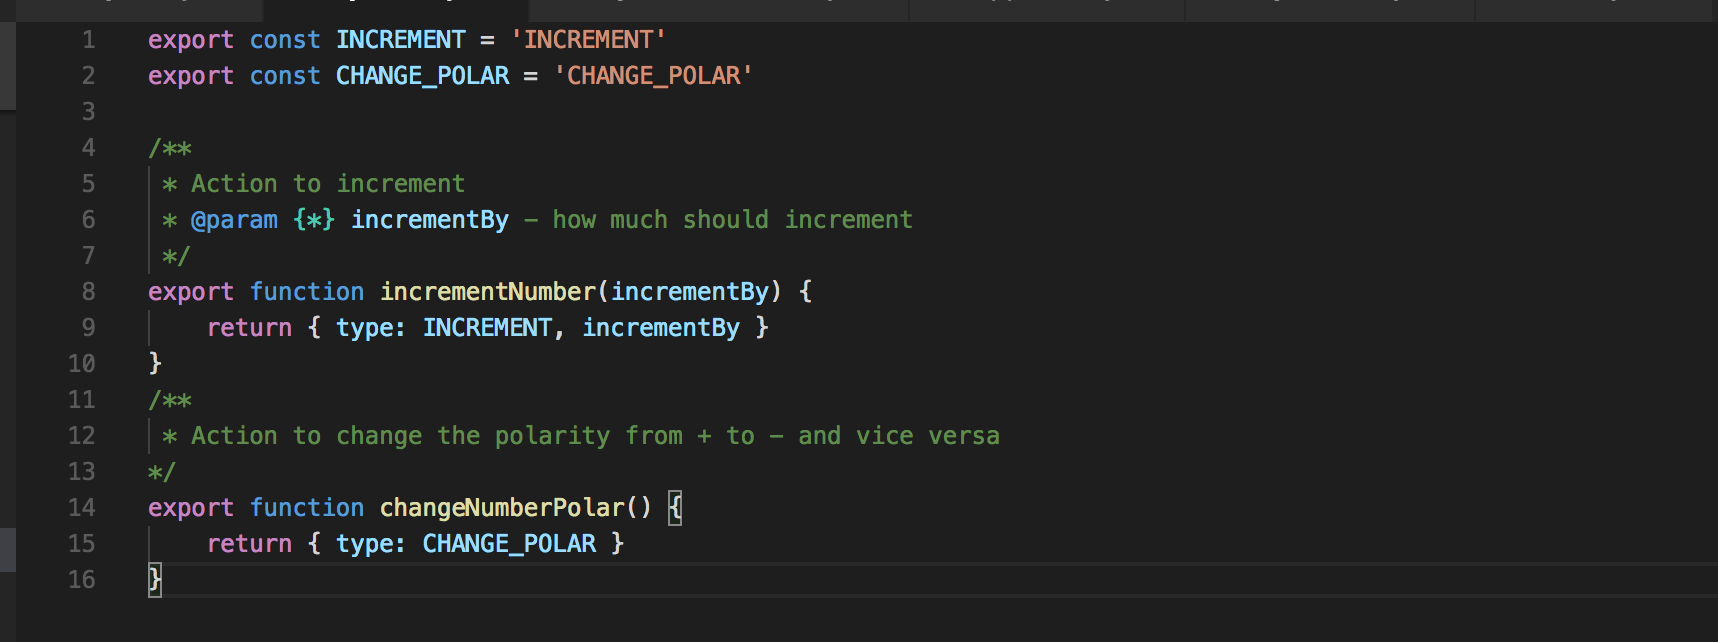
Create a new file “/redux-basic-app/src/myCode/MyAction.js” where defined 2 functions (at line 8 and line 14 ) which prepare the Actions and return as Action Objects. These are simply Action creators, nothing else.
 React_1_redux_action
In this code, there are 2 Actions defined:
(i) At line 15:  { type:CHANGE_POLAR}: This action just indicates to change the polarity/magnitude/Sign.
(ii) At line 9: { type:INCREMENT, incrementBy }: this Action indicates to increment a number using value of  ‘incrementeBy’.

Step 3.4: Create Reducer:

The theory about Reducer:

Reducer is responsible to execute the Action, and based on action change the State of the app (and return a new updated State). So it is a function which takes “the Current State of App” and “Action to execute” as param and return a new State for the App. So, in short, Reducer is responsible to execute the Action and change the state of the action in the Store. for more information, you can have a look at Redux-Reducers Document.

Code and explanation:

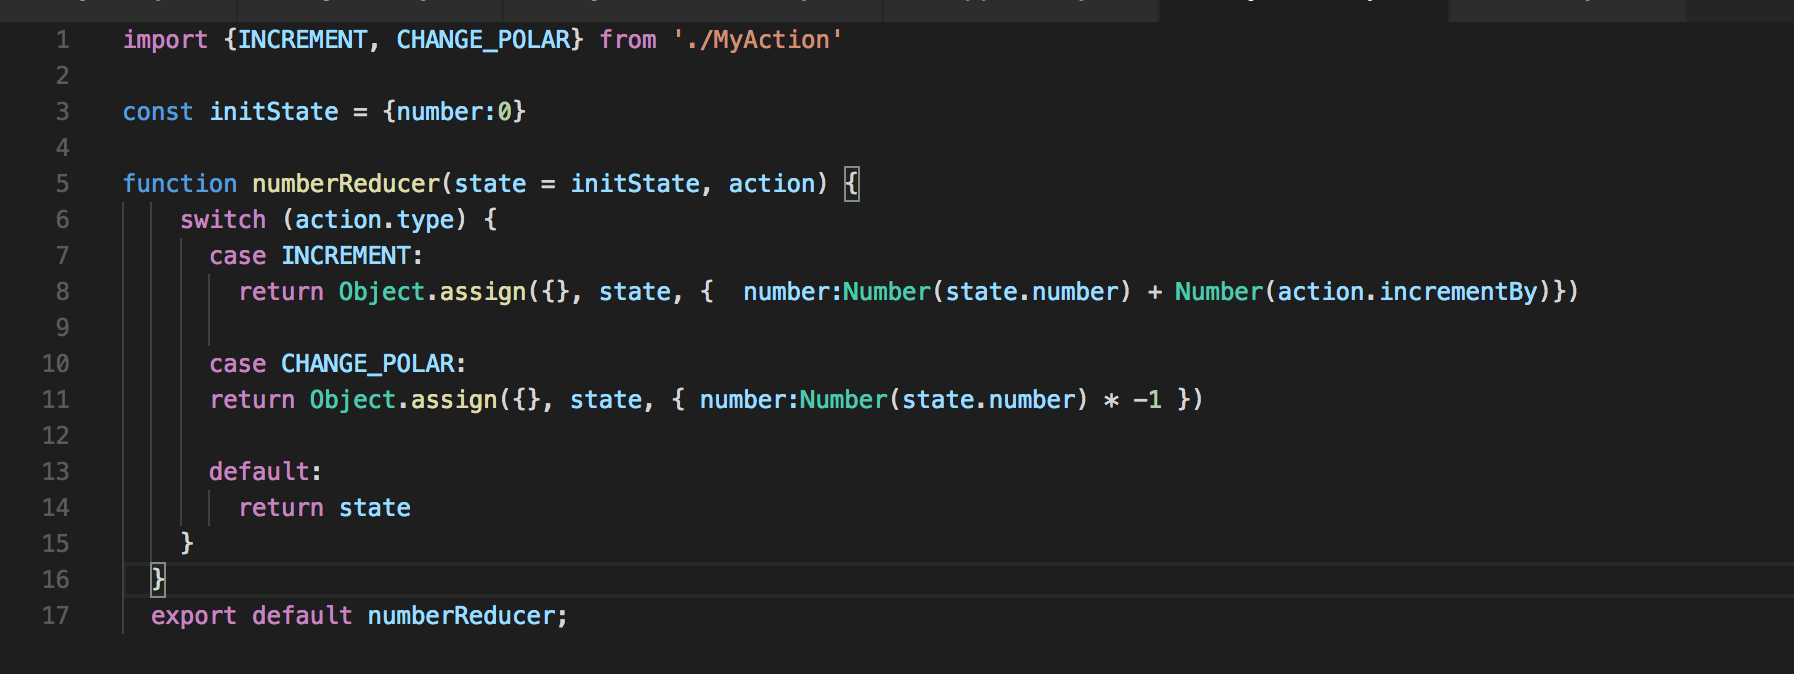
Create another file “redux-basic-app/src/myCode/MyReducer.js” where a reducer named “numberReducer” is defined. According to the definition, it receives current state and action as param. and here we assign a default value of the state with {number: 0}, means default value of the number is 0.

React_1_redux_Reducer

In the above code snippet:

  1. At line no 3: Initialize the default state “initState”.
  2. At line no 5: defined a reducer function “numberReducer”.
  3. from Line no 6-15: use Switch-case on the action.type.
  4. If you notice the case at linen 7 and 10, you will find exact same Type we defined in the Actions in Step 3.2.
  5. Line 8 and 11 returns the new states based on the previous state and for the action on line 7 and 10 respectively.
  6. Thant means here in reducer producing new states based on the action and return it.
  7. if no action is matched, it returns the previous state without any modification.

Step 3.5: Create The Store 

The theory about Store

So far we have Action and Reducer, whose purpose is to change the state of the App in Store. Before creating Store lets review few points:

  1. The purpose of Redux is single Store(for the state).
  2. if you notice Action Objects or Action creators, these are independent, it is just like a command.
  3. if you notice Reducer, it is responsible for changing the state, means somehow it needs to have contact with the Single Store.

So, based on these 3 points, we can say we must have a Store and Reducers need to connect to the Store.

Code and explanation:

Screen Shot 2018-02-15 at 23.31.23

in the above code

  • line no. 6: import from ‘redux’ library.
  • line 7: import of the Reducer we created in step 3.4.
  • line 10: create the Store and pass reducer we created as 1st param and optional initial state of the store as 2nd param. So, in this way, we link between reducer and Store.

So, we have our the famous Store.

NOTE: we can create this store in a separate JS file, but for simplicity, we can add the above 4 lines in “redux-basic-app/src/App.js”. In this example to compare this(redux) version code with the simple version(without redux) code in Step 2, I have preserved the “App.js” file and created a new file named”redux-basic-app/src/AppRedux.js” for the same purpose of “App.js”.

Step3.6: provide/link the Store with App

So, we have Action, reducer and the famous Single Store. Now we need a way to connect the store with the app so that the Store will be accessible for the entire app.

There is a component called Provider of React-Redux library which automatically makes the Store available to all the child component those are directly or indirectly wrapped by the Provider.

Code and explanation:

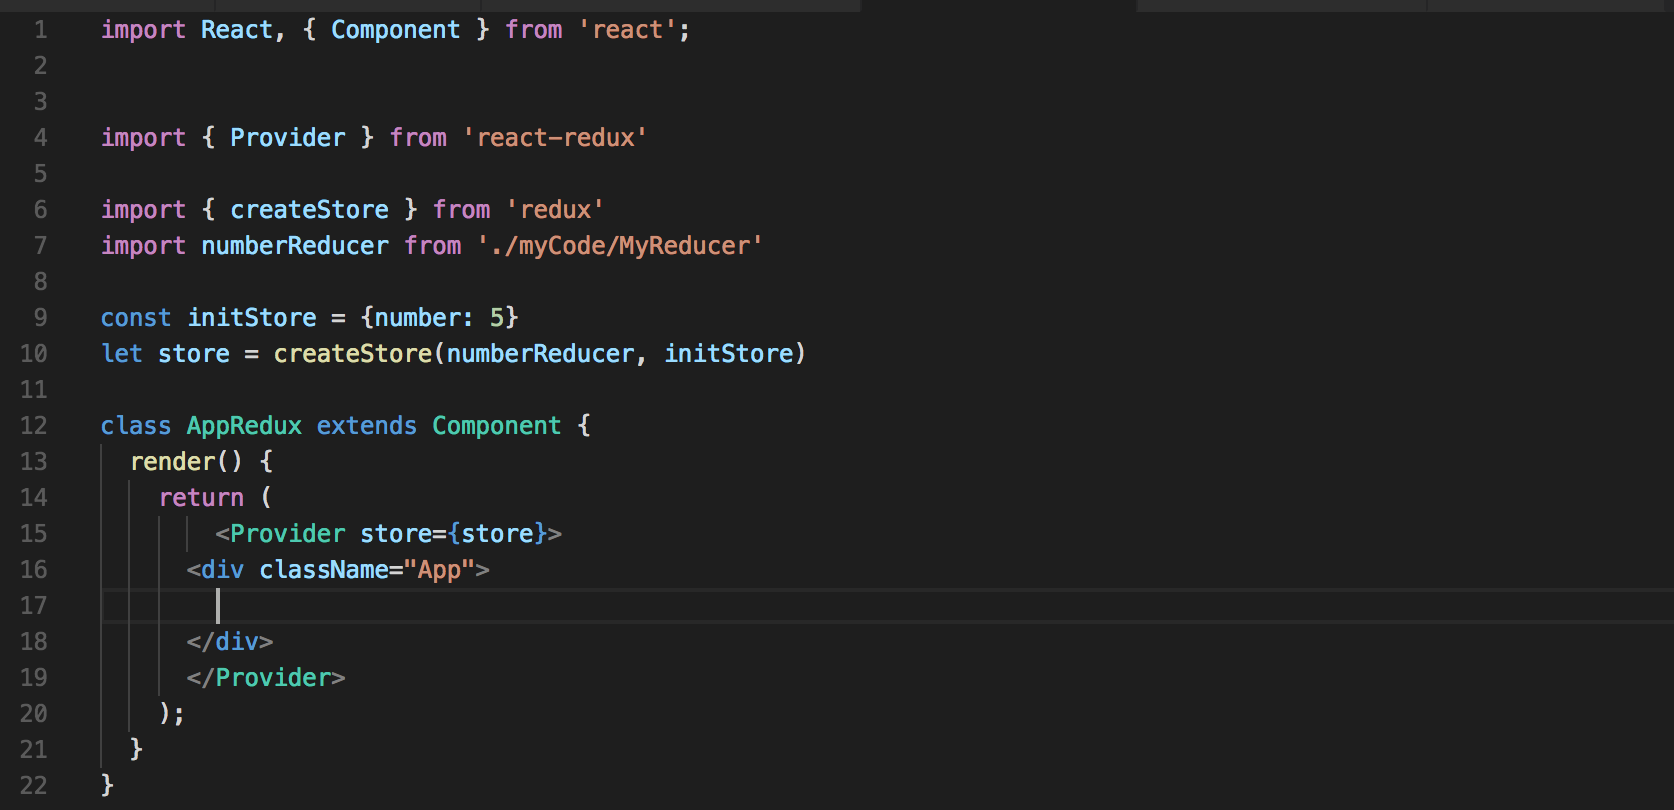
Create a new file “redux-basic-app/src/AppRedux.js” and write code as follows:

Screen Shot 2018-02-15 at 23.55.47

At line 10: create the Store which we have seen in the previous step.

At line 4: necessary import for the provider.

at line 15 and 19: we wrapped other components by the provider with the Store param. in this way we supply or connect our Single Store to the entire App.

NOTE: for now the line 17 is empty, but we will create another Component soon and add it here, and finally show how to make available/connect this store to that component and how the component is going to interact with this store.

Step 3.7: Create a new component and connect it to the Store

in this step, we will create a new View/Component exactly same as the component in Step 2.2 additionally we will connect this new component with the Store (store managed by Redux) we created in step 3.5 and provide it to the app in step 3.6.

Code and explanation:

So, we create a new file”redux-basic-app/src/myCode/MyViewWithRedux.js”.

code part: 3.7.1

React_1_redux_view_1_import

  • at line 4 import component that will connect the current view with the redux store.
  • at line 5 imports the action creators which we created in Section 3.2.

code part: 3.7.2

React_1_redux_view_2_sate

The only change in this section is, we removed “number” from the local state because we store the information in the Redux store. if you remember in step 3.5 we pass a init param ({number: 5}) when we created the Store. and keep the state of  “incrementBy” as it was in the previous example.

code part: 3.7.3

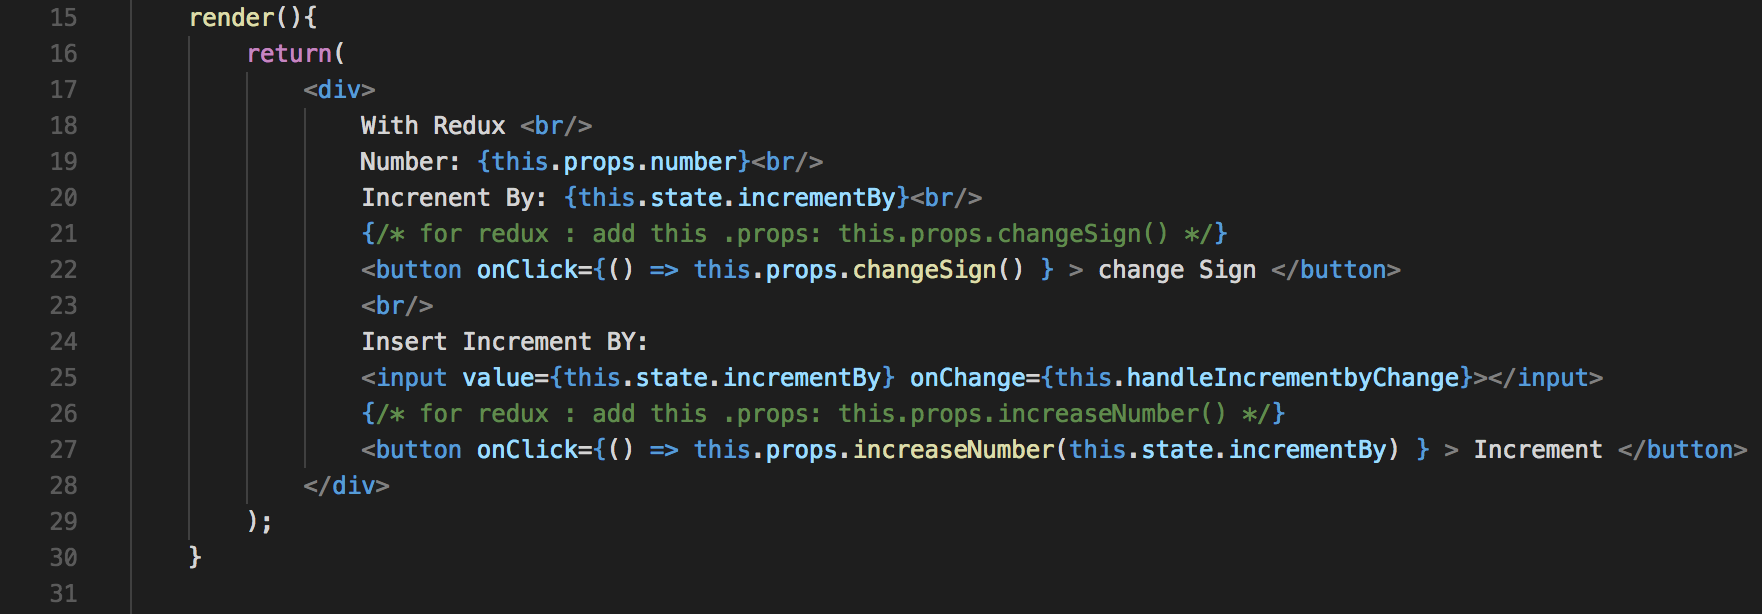
React_1_redux_view_3_render

In the render part, it is almost same except we changed the callback function of the buttons from “this.” to “this.props.”. We changed this because in our previous example all of our call back function was local to the Component and those function needs to handle the local state only, but now the callback function needs a way to Dispatch Action so that the Redux store can be updated according to dispatched function. So, we get these callback function from the component props which are somehow passed to the props from outside, and we will see the way to pass the function in a moment in code part: 3.7.6.

code part: 3.7.4React_1_redux_view_4_inputChange

The callback function for Input field same as before update the value of “incrementBy” in Local State.

code part: 3.7.5React_1_redux_view_5_state2prop

Now the important part! this is a function which receives state as param and returns an Object with property mapping. So, what is the purpose of this function?

The purpose of the function is:

  1. To receive the State from The Redux Store (the famous Single Redux Store) after an Action dispatched.
  2. After receiving the state it maps the needed item/element from the state to the Component property after if any additional processing(optional) is needed. otherwise, everything in the state is passed to the props of the Component.

So, when the Store is updated, this function is called. In Short, it is a way to contact View/Component from the store. But to achieve this we need a way to connect this function with both Store and this component. And we will see the way in code part: 3.7.7.

For more details read this.

code part: 3.7.6

React_1_redux_view_6_siap2Prop

This function receives the dispatch() method and returns callback props that can be injected into the component property. what is the purpose?

The purpose is:

We have the access to dispatch() method which we can use in our callback functions of the buttons to dispatch an Action, inconsequence which changes the state of the Famous Single store.  Means it is a way to make the change in the Store from the View/Component by dispatching an action.

code part: 3.7.7React_1_redux_view_7_connect

Now it is time to link all three:

  1. The component: MyViewWithRedux
  2. The function “mapStateToProps”, communication link from Store to Component
  3. The function “mapDispatchToProps”, a communication link from Component to Store better with Reducer.

All happens with that single statement.

Step 3.8: add the newly created component in the “AppRedux.js”.

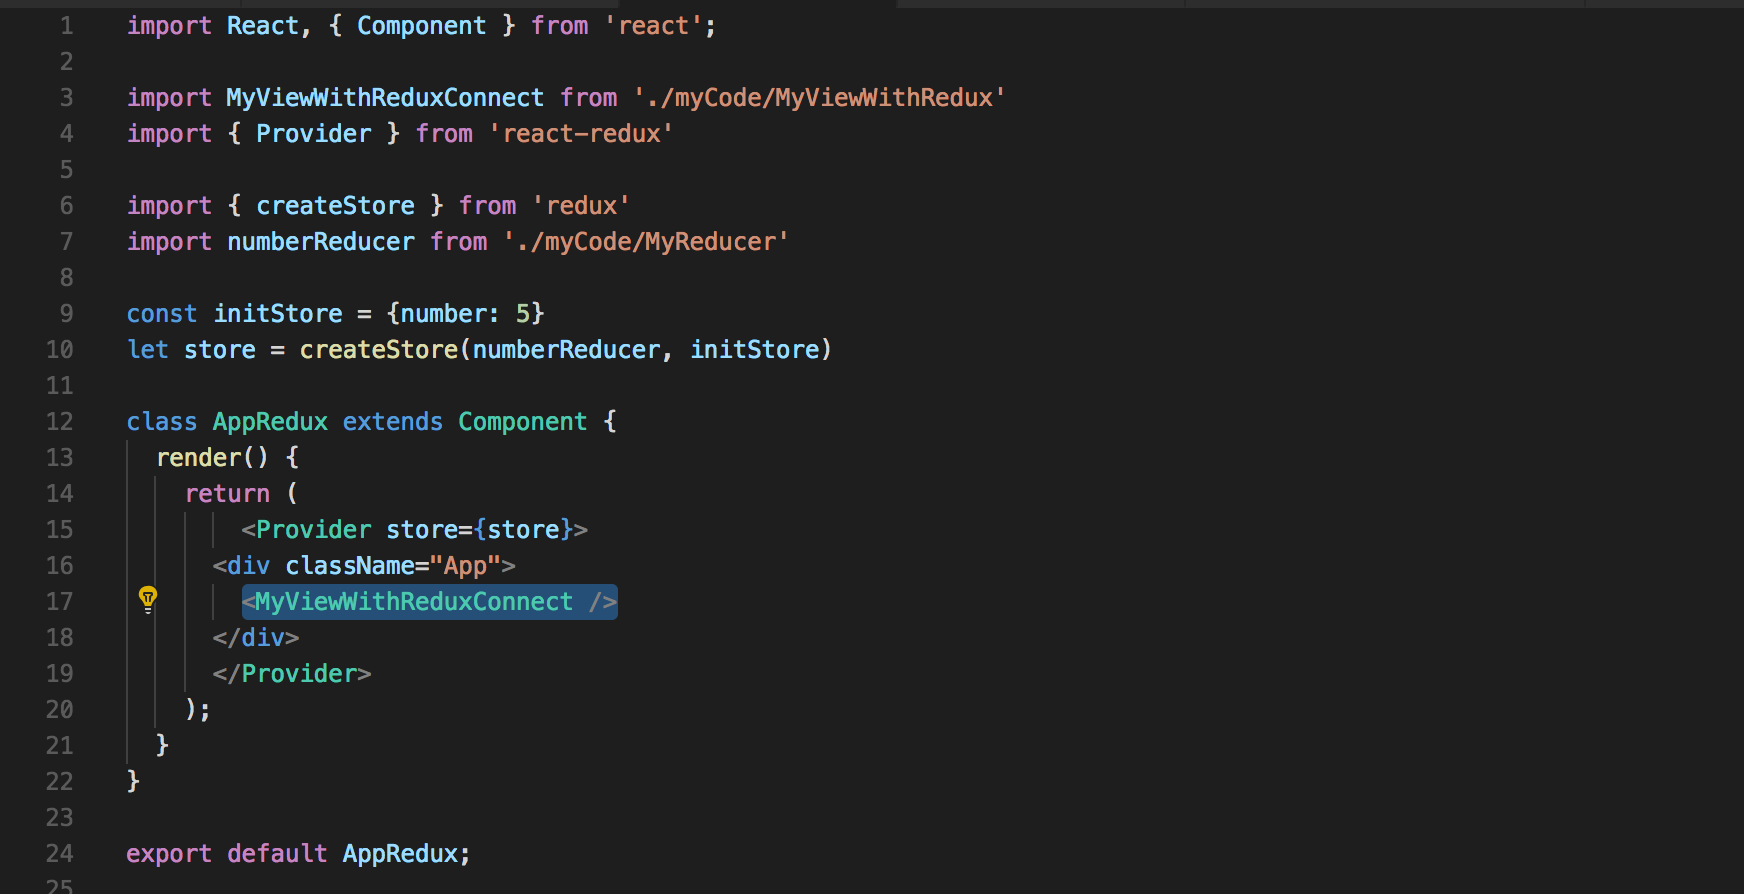
Screen Shot 2018-02-16 at 01.36.20

just look at line 3 and 17: added the new component in the App, and notice this is under (store provider) tag, so the store became available to this store also.

Step 3.9: Final touch

Screen Shot 2018-02-16 at 01.36.51

at line 8-9: we just replace with

Step 4: Save all files and run the app.

$yarn start

you must see the same view and functionality as the first part.

Conclusion:

This article is written based on my personal experience and for the fresh beginner who wants to learn and understand the mechanism of Redux by creating a simple app step by step. Here I tried to explain the concept in an easier way, maybe very much informal way. If you think there are big conceptual mistakes, please feel free to correct me in the comments section, so that other readers can get the correct information.

Thanks for reading with patience!!

JHipster: Error in Liquibase changelog generation.

Case/Problem: 

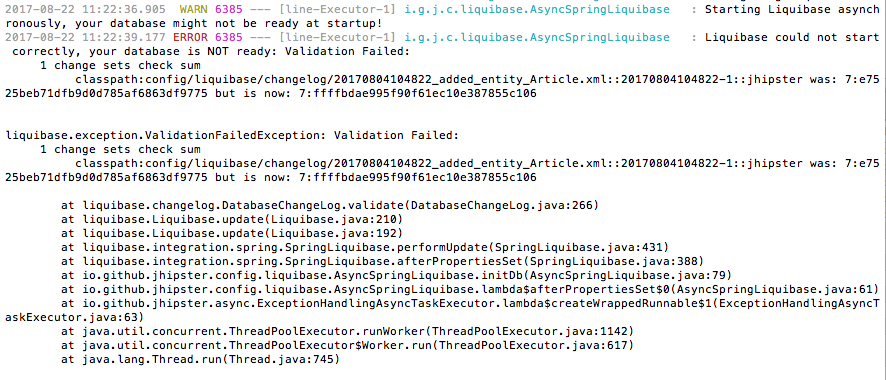
After adding more fields or relationships in an existing Entity using “yo” or “jhipster” command, especially after adding new fields every time I found following error ( this error is for entity named “Article”) :

ERROR 6385 [line-Executor-1] i.g.j.c.liquibase.AsyncSpringLiquibase  : Liquibase could not start correctly, your database is NOT ready: Validation Failed:
1 change sets check sum

classpath:config/liquibase/changelog/20170804104822_added_entity_Article.xml::20170804104822-1::jhipster was: 7:e7525beb71dfb9d0d785af6863df9775 but is now: 7:ffffbdae995f90f61ec10e387855c106

JHipster_Liquibase_Validation_fail
Liquibase validation fails on the Jhipster project run after modify an existing entity.

Cause:

This error means that we manually changed something on the database table which is no longer matches with the changeset defined in the:  20170804104822_added_entity_Article.xml
But what actually happened is, jhipster added additional information as changeset for newly added fields in the 20170804104822_added_entity_Article.xml, which doesn’t match with the existing table in the database.
As an example following information added in20170804104822_added_entity_Article.xml file but in Article Table the field “highlights” was missing when I added a new field named “highlights” in the Article entity:
<addColumn tableName="article">
 <column name="highlights" type="varchar(255)"/>
</addColumn> 

Issue:

To resolve the problem, you may clean databasechangelog table in your database and drop the Article table, and then start your project again. So, the project will create the Article table again from scratch following the changeset 20170804104822_added_entity_Article.xml.
Or you may update the value of MD5SUM field of databasechangelog table for the with the new one in the error (in my case): 7:ffffbdae995f90f61ec10e387855c106. So this changeset will be ignored by the Liquibase. But the problem is, the new field or your changes will not be applied to the table.
In this way, you can by pass the error with the cost of losing all of you data in Article table, or not synchronizing the table with Article class. But obviously, this is not what we want.

Solution: 

Before you start modifying any Entity, I highly recommend using any version control tools like Git, so that you can revert your change if needed. For this particular case, we need to revert changes in 20170804104822_added_entity_Article.xml made by Jhipster code generator. So, from this point, I assume that you have a stable committed point where you have no error on project run.
  • First, update your existing Entity (in my case the entity name is “article”) using “yo” or “jhipster” command (I assume that you know how to do that, this article will not cover that part). When jhipster ask for replace/update the files, make sure you replace/update 20170804104822_added_entity_Article.xml.


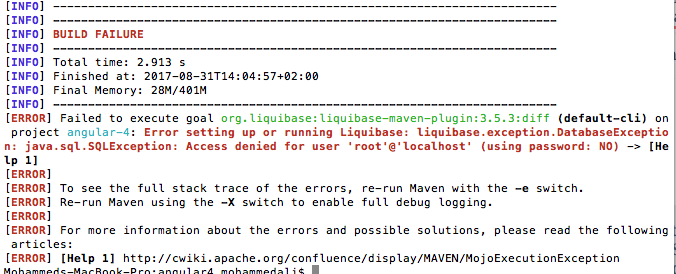
  • After modification process complete run : “./mvnw liquibase:diff”, which must create a change log in “config/liquibase/changelog/” folder with a random name. But you may encounter with the following error.
Error setting up or running Liquibase: liquibase.exception.DatabaseException: java.sql.SQLException: Access denied for user ‘root’@’localhost’ (using password: NO) -> [Help 1]
liquibase diff generate error
  • In case you face the error, means you forget database configuration for “liquibase” (don’t be confused with database configuration for the application) in “pom.xml” file. So, go to pom.xml and find the configuration section for liquibase and provide appropriate information for your database.
Modify following section in pom.xml :
<configuration>
      <changeLogFile>src/main/resources/config/liquibase/master.xml</changeLogFile>
      <diffChangeLogFile>src/main/resources/config/liquibase/changelog/${maven.build.timestamp}_changelog.xml</diffChangeLogFile>
      <driver>com.mysql.jdbc.Driver</driver>
      <url>jdbc:mysql://localhost:3306/angular4</url>
      <defaultSchemaName>angular4</defaultSchemaName>
      <username>root</username>
      <password>****</password>
      <referenceUrl>hibernate:spring:com.mycompany.myapp.domain?dialect=org.hibernate.dialect.MySQL5InnoDBDialect&amp;hibernate.physical_naming_strategy=org.springframework.boot.orm.jpa.hibernate.SpringPhysicalNamingStrategy&amp;hibernate.implicit_naming_strategy=org.springframework.boot.orm.jpa.hibernate.SpringImplicitNamingStrategy</referenceUrl>
      <verbose>true</verbose>
      <logging>debug</logging>
 </configuration>
  • Now re-run : “./mvnw liquibase:diff”, which must create a change log in “config/liquibase/changelog/” folder with a random name. if you open the file, you must see the changeset that reflects your changes.


  • In case, if you dont see the change reflection on the file, open the 20170804104822_added_entity_Article.xml, copy the additional change and past it in the “<changeset>” tag in the newly created file as below:
 <changeSet author="author name (generated)" id="1504182236727-1">
   <addColumn tableName="article">
     <column name="highlights" type="varchar(255)"/>
   </addColumn>
 </changeSet>
  • Rename it with a meaningful name and add this new file to “master.xml” file.


  • checkout “config/liquibase/changelog/20170821111321_added_entity_<EntityName>.xml” file you go back to original state of the file before modify your entity. So, the checksum will be same as the database.


  • run “./mvnw ” to run the Jhipster project, the database will be automatically synchronized according to the changelog.

Conclusion:

Here I tried to show, how to resolve liquibase conflict error every time we faced while modifying an existing Entity in a jhipster project.

This article is written based on my personl experience. If you think there are other better way to do this, please feel free to write your opinion in the comments section.

AngularJs: JHipster: SPA: Resolving an attribute depends on another resolved attribute.

For a particular state of an entity “Request” like “request-detail”,  I need to resolve an attribute which needs values from another attribute resolved in the same State earlier.


For an example: 

Let’s say we have an entity “Request”, which has attributes named “type” and “subType”. And we have another entity “TypeConfiguration”, which has One-to-Many relationship with “Request” entity using attribute “type” and “subType”. So, a single “TypeConfiguration” may have relationships with multiple “Request”.

In this case, I want to display both “Request” and “TypeConfiguration” details on “request-detail” state.

Assumption: 

  • This is a Jhipster AngularJS SAP application and all the entity is created using yo command.
  • All the necessary services are created.

Solution: 

Let’s say we already have a service for getting a “TypeConfiguration” by “type” and “subType”. And the URL for the API is:  

“api/type-config-by-subtype/:type/:subType” 

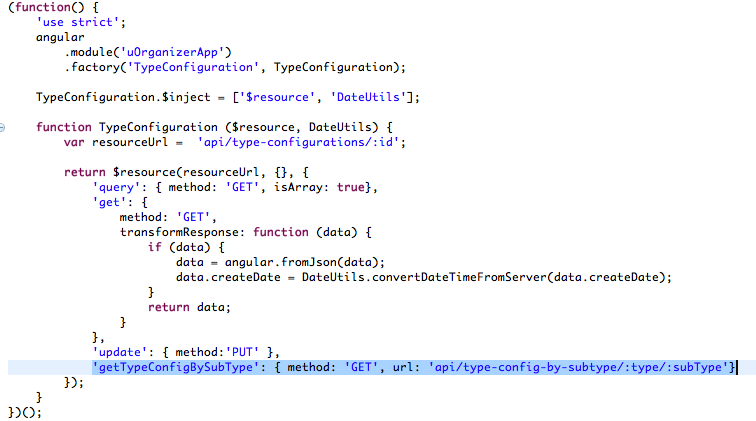
Now, we will declare this service in the “type-configuration-service.js” file (which is automatically created by Jhipster project when you create an entity using YO command) by adding the following line:

‘getTypeConfigBySubType’: { method: ‘GET’, url: ‘api/type-config-by-subtype/:type/:subType’}

TypeCOnfigurationServiceJS

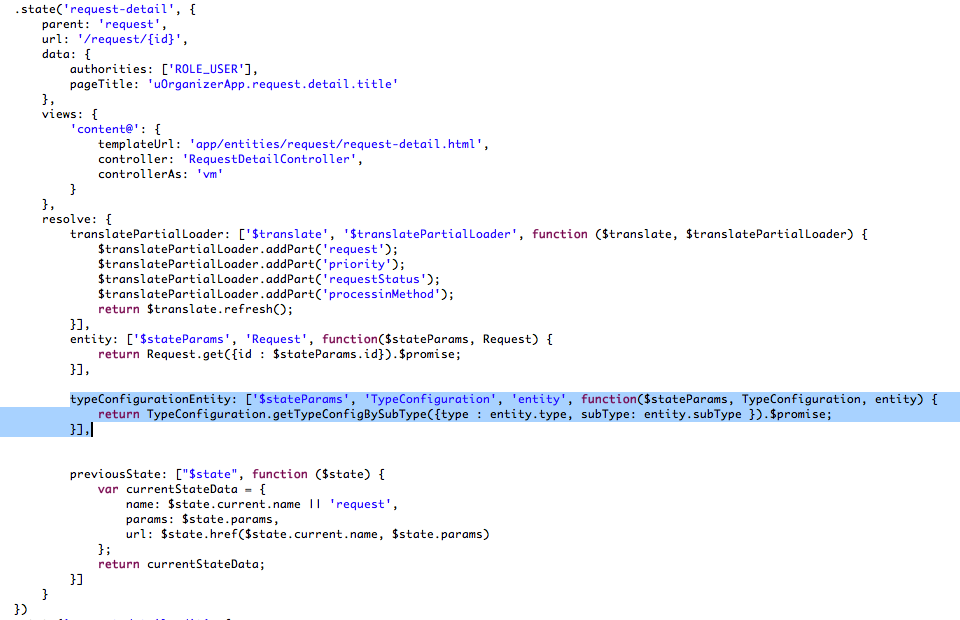
Next, we need to modify “request-detail” state in the “request.state.js” file which is also automatically generated. In this state, the attribute “entity” is already resolved which represent a “Request” entity. We need to resolve “TypeConfiguration” entity based on the resolved entity. To do this we need to add the following section to this state as below:

typeConfigurationEntity: [‘$stateParams’, ‘TypeConfiguration’, ‘entity’, function($stateParams, TypeConfiguration, entity) { return TypeConfiguration.getTypeConfigBySubType({type : entity.type, subType: entity.subType }).$promise;}]

RequestStateJS


Note:

  • We have added this section just after resolve “Request”, which is saved as “entity”.
  • We have injected the dependency “TypeConfiguration” Service, and “entity” attribute which is resolved in the previous step.
  • We pass the entity.type and entity.subType as the parameter of the API call.
  • The resolved “TypeConfiguration” will be automatically passed to the state Controller as “typeConfigurationEntity”, in this case, the controller is “RequestDetailController”.


At the end, we need to modify “request-detail.controller.js” file which represents “RequestDetailController”.  Here, we need to inject “typeConfigurationEntity” to get the value from”request-detail” state, and store the value in”vm.typeConfigurationEntity”. And thus you can access the resolved “TypeConfiguration” dependent attribute from view to display necessary information.

RequestDetailsControllarJS

Note:

  • when I inject the attribute I have used the same name”typeConfigurationEntity” as I did in the “request.state.js” file.

Conclusion:

Here I tried to show, how we can resolve a dependent attribute and pass the resolved attribute from State to Controller.

If you think there are other better way to do this please feel free to write your opinion in the comments section.


Thanks!


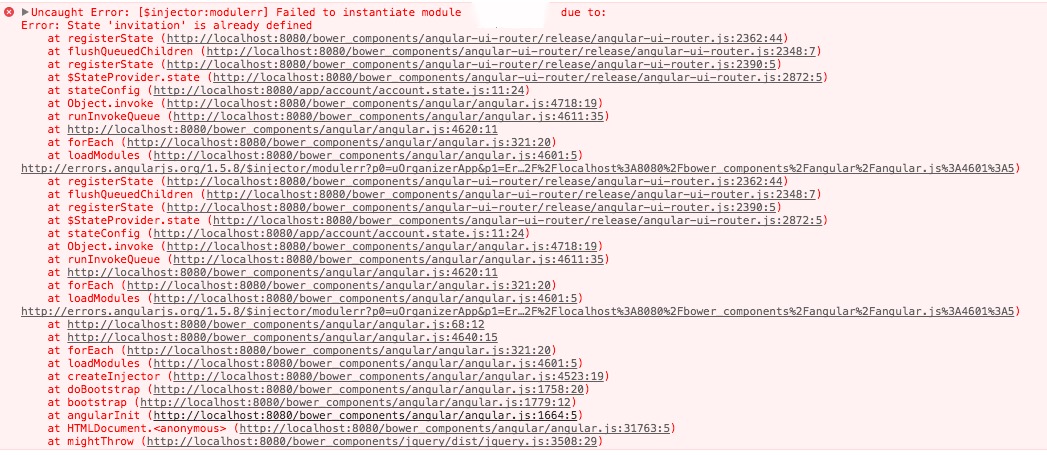
AngularJs : JHipster: SPA: Uncaught Error: [$injector:modulerr] Failed to instantiate module XXXApp due to: Error: State ‘X’ is already defined.

I have faced the following error for a Jhipster SPA application with AngularJS:

Uncaught Error: [$injector:modulerr] Failed to instantiate module XXXApp due to:
Error: State ‘invitation’ is already defined

AngularJS_duplicateState

Case:

  1. First I have created a new State (invitation.state.js) manually and add it to “index.html” page.
  2. Then I have added a new Entity using Jhipster yo command.

Just for above case, I have faced the error.

Cause:
when I executed case [2]: generate a new entity using yo command, the generator overwrites the index.html, and adds again the “invitation.state.js” file to “index.html“. So, there were duplicate declarations for the same file.

Resolve:

  1. You can manually remove duplicate file declaration.
  2. You can simply execute “yo jhipster”, which will try to regenerate all the necessary file, and you can confirm overwrite or ignore file by file. and of course, you need to overwrite “index.html” in this case.


This article is written based on my personal experience. there can be other cause and better solution. If you have other case and solution please feel free to share your thoughts in comments.

thanks!

Skype audio input dosen’t work in Ubuntu 14.04.

pulseaudio server is not configured correctly.

remove the pulseaudio server together with its configuration:

sudo apt-get remove –purge pulseaudio

Then check that config files in  /etc/pulseaudio/* do not exist, if they do, remove them.

Then remove local config directories: probably “.config/pulse” and maybe also “.pulse” from your home directory.

then run again

sudo apt-get install pulseaudio

You might also try to remove skype with  its configuration files,  sudo apt-get remove –purge skype

rm -r .config/Skype

rm -r .Skype

and then reinstall skype.

Installing Skype

Users of 64-bit Ubuntu, should enable MultiArch if it isn’t already enabled by running the command

sudo dpkg --add-architecture i386

Since Ubuntu 10.04 (Lucid Lynx), Skype is part of the Canonical partner repository. To install Skype add the Canonical Partner Repository. You can do this by running the command

sudo add-apt-repository "deb http://archive.canonical.com/ $(lsb_release -sc) partner"

Then install Skype via the Software-Center or via the Terminal.

sudo apt-get update && sudo apt-get install skype

It is highly recommended to use the package provided in the Canonical partner repository, not the one distributed from the skype website, as the skype website currently points users to the wrong package for 64-bit systems of Ubuntu 11.10 and above.

To Add a Run-Time Lookup Form for a Surrogate Foreign Key Field:

Case:

Suppose we have two different relational table SKI_InventSpareMaterial and SKI_MaterialCodes, where SKI_InventSpareMaterial table contains recId of SKI_MaterialCodes as foreign key.


SKI_MaterialCodes:contains Material Code and Material Name.

SKI_InventSpareMaterial:map between ItemId and Material Code.


We want to create a Form/Mask from where user will select Material_code (user can choose Material code instead of RecId of the material code) for a product code but after saving the SKI_InventSpareMaterial table will contain recId  instead of Material code. But the user will always see the Code instead of RecId.


Solution:

This problem can be solved by runtime Lookup. As here the relationship is based on RecId (Surrogate foreign key)  we have to follow the procedure (different from Natural Foreign Key Field) step by step:


  1. add fields(CodeName, MaterialCode)  in Autolookup Group in the lookup Table (SKI_MaterialCodes), from where we will lookup our data.

Image2. Create a new Form in the AOT, named for example “MA_RuntimeLookupTestForm” .

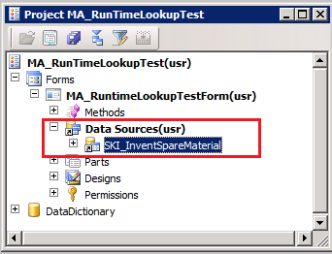
3. Add Table “SKI_InventSpareMaterial” as a data source of the form, by drag and drop the table in the Form->Data Source node.

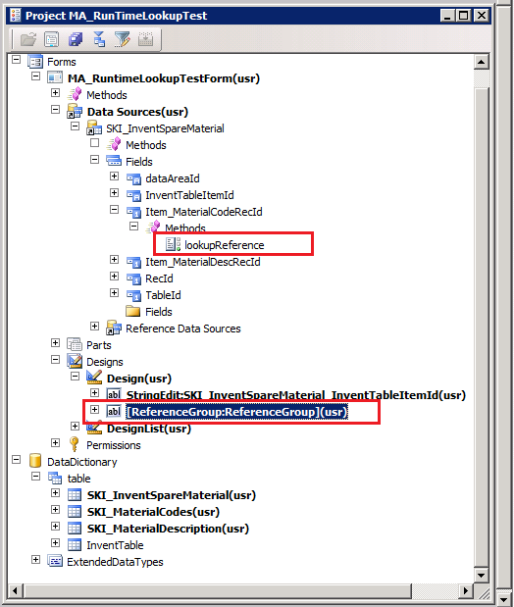
Image4. Expand Data Sources(SKI_InventSpareMaterial), expand Fields, find and expand the field(Item_MaterialCodeRecId) you identified in the previous step. Right-click Methods, click Override method, and then click lookupReference. The lookupReference method appears in the code editor.


Image5. Comment out the existing contents of the method. If you do not comment out the call to the super method, the standard lookup form might appear.


public Common lookupReference(FormReferenceControl _formReferenceControl)

{

   /**

    * commented out the existing 3 lines of following code.

    */

//Common ret;

//ret = super(_formReferenceControl);

//return ret;

/**

 * Declare the table that you want to use in the lookup form and a query object.

 */

SKI_MaterialCodes   matCodeTbl;

Query               lookupQuery;

/**

  * Create an instance of the SysReferenceTableLookup class.

  * The SysReferenceTableLookup creates the lookup form that

  * appears when you click the lookup button.

  */

SysReferenceTableLookup sysTableLookup = SysReferenceTableLookup::newParameters(tableNum(SKI_MaterialCodes), _formReferenceControl, true);


/**

 * Specify the fields that appear in the lookup form.

 * The following code examples add the CodeName

 * and MaterialCode fields from the SKI_MaterialCodes table.

 */

sysTableLookup.addLookupfield(fieldNum(SKI_MaterialCodes, CodeName));

sysTableLookup.addLookupfield(fieldNum(SKI_MaterialCodes, MaterialCode));

/**

 * Use a query to retrieve the records that appear in

 * the lookup form. The following code example uses

 * the query to retrieve a list of Material Codes.

  */

lookupQuery = new Query();

lookupQuery.addDataSource(tableNum(SKI_MaterialCodes));

sysTableLookup.parmQuery(lookupQuery);

///

///Use the peformFormLookup method to open the lookup form.

/// The performFormLookup method returns the selected value from the lookup form.

///

matCodeTbl = sysTableLookup.performFormLookup();

/*

 * The following code example returns the selected Material Code object

 * to the field in the form data source.

*/

return matCodeTbl;

}


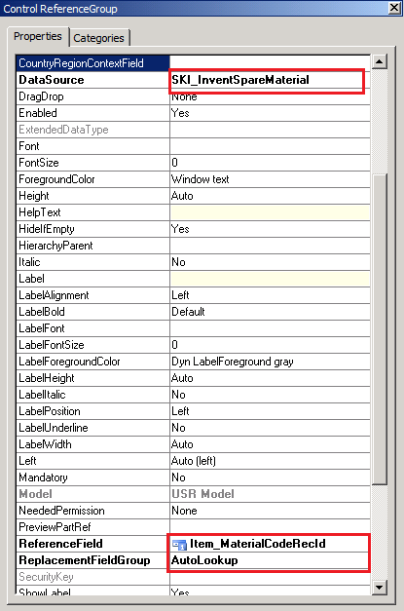
6. Goto designs->Design  of the form add a new ReferenceGroup control. Go to the property of the ReferenceGroup control And Set property as following:

  • DataSet                                       : SKI_InventSpareMaterial
  • ReferenceField                           : Item_MaterialCodeRecId
  • ReplacementFieldGroup             : AutoLookup


**Remember to add those fields(CodeName, MaterialCode)  in advance which we want to lookup in the Autolookup Group in the lookup Table (SKI_MaterialCodes).

Image

7. Compile and open the form. You will see a form like that:

RuntimeLookup-form


Reference: http://msdn.microsoft.com/en-us/library/aa627966.aspx